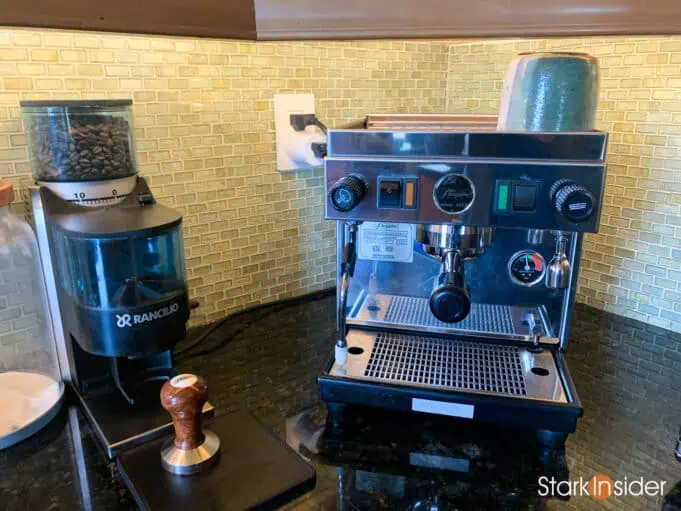
My poor Livia. As usual I missed its annual cleaning reminder in my Google calendar. 5 years. In. A. Row. I partly blame the pandemic for that. But I know in my heart that’s ridiculous as shelter-in-place would possibly be the best time to take my time and service the well-loved and used machine within the comfortable confines of home.
Regardless of my procrastination I finally got around to it this weekend and thought I’d share some photos, thoughts, and tips on cleaning and servicing a Pasquini Livia 90.
By the way this is one of the machines that lead the home espresso boom (aka prosumer boom) in the 1990’s and 2000’s. There were other key players too. Brands like Rancilio, Quick Mill and, of course, the mighty little wonder that is the Gaggia Classic. All beautiful and well-built Italian espresso machines that were both reasonably priced and relatively easy to use sparked demand for a home barista revolution.
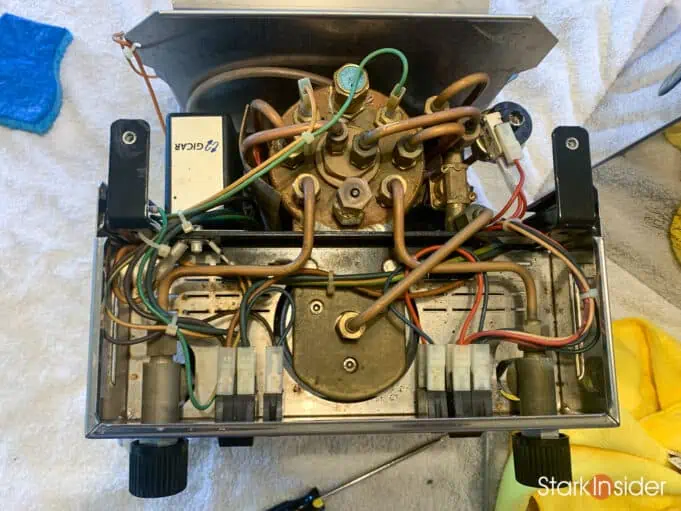
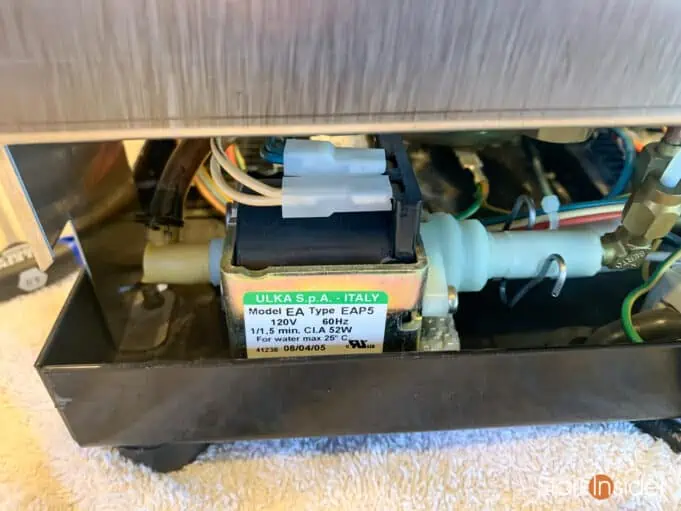
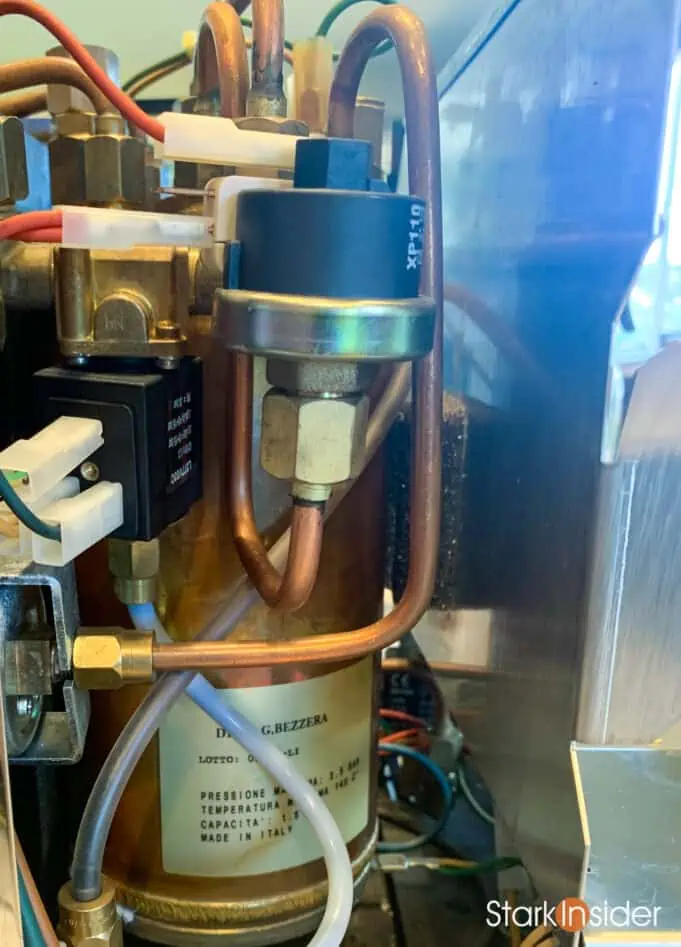
As far as I know this Pasquini was actually made by Bezzera, which is yet another well regarded Italian espresso brand. Squint hard at the current Bezzera BZ13 and you might even see some resemblance to the Livia 90 — slightly different aesthetics, but controls are almost all in the same places. In any case the Livia 90 is impressively built. I’m amazed every time I pop it open the case how complex these seemingly simple machines are to construct. Lots of tubing, piping, electronic relays, pumps, etc. And, of course, a fairly large boiler that helps contribute to its near 50-pound weight.
If you get a chance to buy a used Livia for a decent price, I say go for it, especially if you’re a little bit handy and don’t mind a little bit of elbow grease and sweat equity to get it up and running again. In my experience this is a reliable machine that can pull shots with the best of them, even well into the 21st century.
Cleaning a Pasquini Livia 90: What You’ll Need
Here’s some things I used on my machine. This is not a definitive list. And it will depend, obviously, on what needs to be done. In this case, I’m not doing any plumbing, or working on any of the internals, the pump, etc. (aside from basic cleaning of the inside components and case). Instead, this is what I would consider a routine annual maintenance.
So I’ll be taking out the group head, shower screen and shower head, soaking and cleaning all the components including the portafilter. I’ll then replace a few O-ring gaskets before assembling everything back together again. Think of this is an annual oil change for a car — a dying breed in its own right!
Tools to have on hand:
- Philips screwdriver
- Flat screwdriver
- Pry tool (to remove stubborn gaskets)
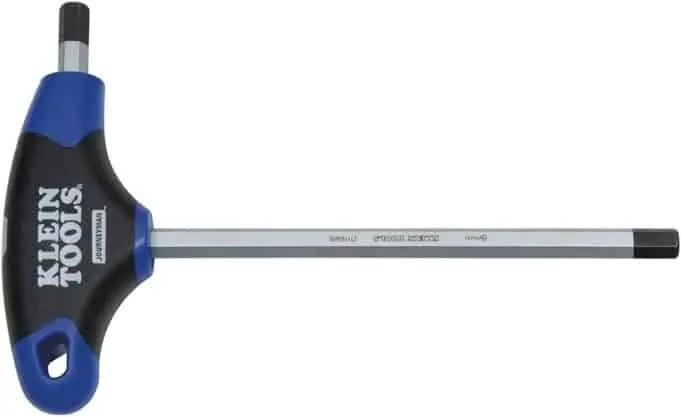
- 4 mm hex key with T-handle (to remove group head bolts)
- Possibly a hammer
- Cafiza espresso machine cleaning powder (magic)
- Group head (Coffee) cleaning brush or brushes (the ones with really strong bristles for cleaning inside the group)
- Pasquini/Bezzera replacement gaskets for the group head (two, one small for the top and one larger one for the bottom where the portafilter clocks in)
- Microfiber towel or two
- Large containers to use for soaking various Livia components including the portafilter, group head, and assorted bits and pieces
Disassembling a Pasquini Livia 90
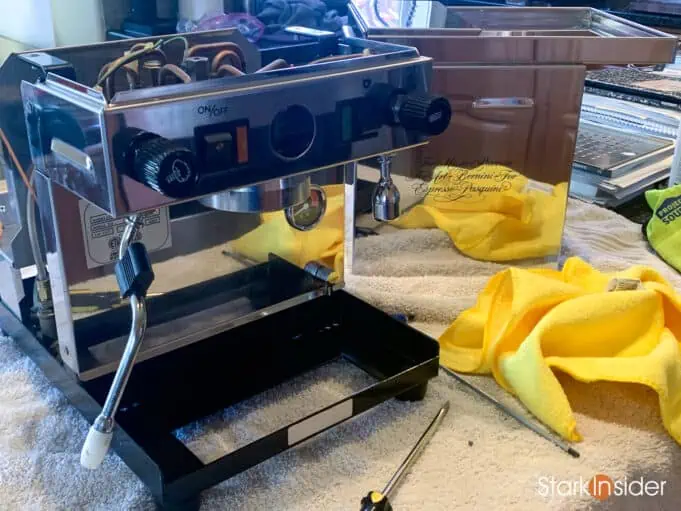
Taking this beast apart is not hard at all. In fact there’s just two Philips screws holding the exterior stainless steel case in place. Those are on top, left and right, underneath the warming cup cover which lifts off.
Before you get started I recommend removing the portafilter, water reservoir and drip tray. Consider soaking your drip tray now with some Cafiza so when it’s done in an hour or so your work will also be almost complete at about the same time.
Unscrew those two screws and the case lifts off easily. Careful not to damage or scratch the stainless steel finish. You may want to cover things with soft towels, or even use gloves while working. Make sure you have lots of space.
Tip:
Visually inspect the wear of both the portafilter and water reservoir. Now might be a good time to order replacement parts if they look worse for wear. Especially note if the portafilter is clocking in correctly and that there’s no extreme wear on the two lock points.
Removing the Group Head on a Pasquini Livia 90
Now you’ll likely want to remove the group head. This is the heart of today’s service and cleaning work. It’s pretty basic. However, the one challenge you may face is that of time. If your Livia has been sitting for a while or not maintained in years, expect bean oil to do nasty things, especially to screws and mounts. You may need to use a lot of force in some cases to remove stubborn, old screws.
To remove the Livia 90 group head, I highly recommend watching this excellent video below from the Pasquini team themselves:
WATCH: How to Change Your Group Gasket on a Pasquini/Bezzera (by Pasquini)
Essentially, there are three 4mm hex screws holding the group head in place. You access those from the top, at the front of the machine, as seen in the above video.
I recommend a 4mm hex key with a T-handle as recommended by Pasquini (see below) as you’ll likely need to apply a fair amount of torque to remove them. In my case they came off with a bit of effort, but weren’t too bad.
Make sure your other hand is holding onto to the group head as you loosen the three bolts so it doesn’t fall. In my case it didn’t budge when loosened. We had to wiggle it and pry slightly at the edge to get it to drop, thanks to years of bean oil and residue which conspired to create a fused adhesive. That was a little tricky, but eventually the group head came off.
You might not need to remove the group head if all you’re planning to do is replace the main gasket after, say, a 6- or 12-month interval. Instead you can just carefully flip the Livia upside down and access the underside from there.
However, if it’s been a long time I highly recommend following the instructions above and removing as you’ll probably need lots of leverage to remove a stubborn, hardened gasket (which may even need a hammer!).
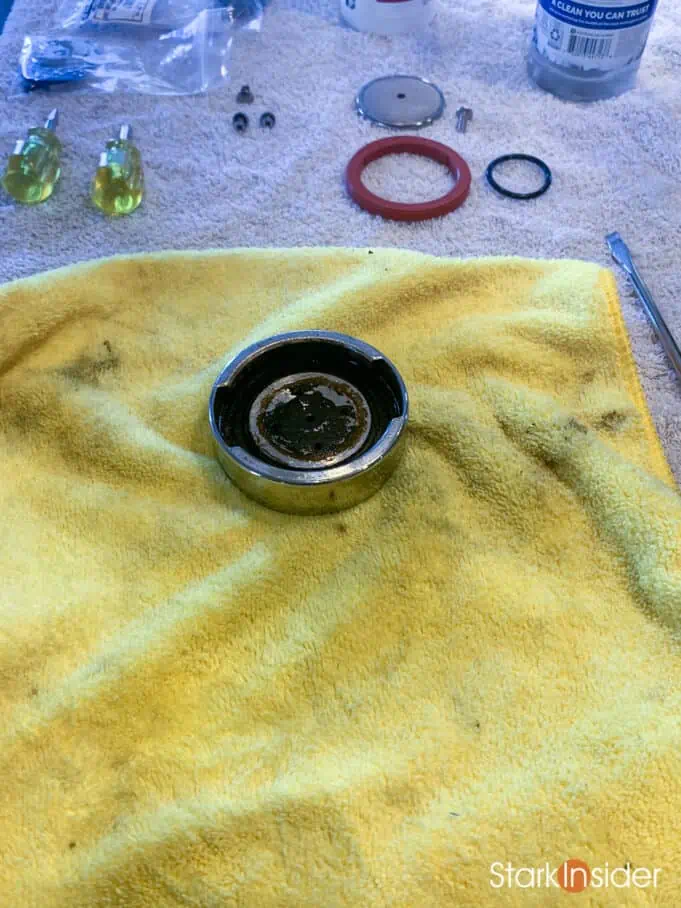
Removing that Stubborn Old O-Ring Gasket on a Pasquini Livia 90
Hint: I’ve had more fun doing most other things!
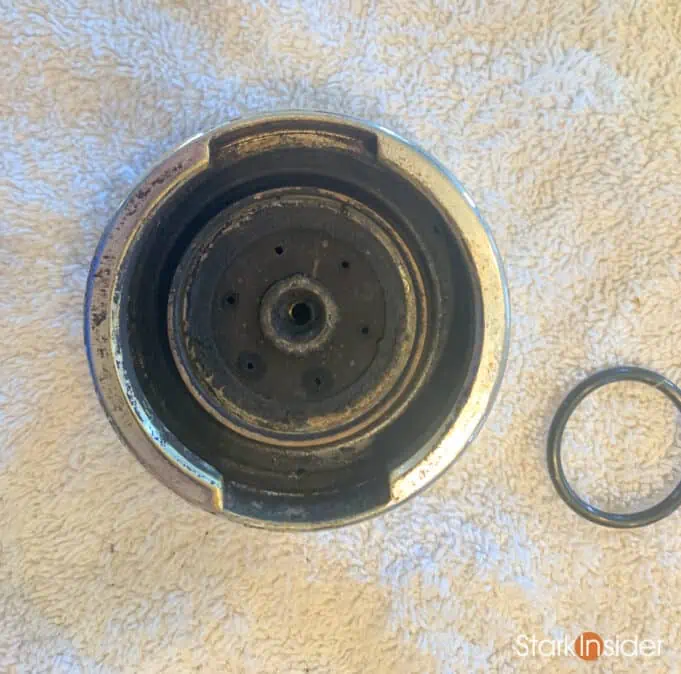
Inspect the group head. You’ll see two O-rings. A small one on top, and a much larger one buried in the bottom. The small one should remove easily. It’s the main gasket that will likely be the bane of your existence.
Indeed, my Pasquini group gasket was hardened. Real good!
First, remove the shower screen by removing the Phillips screw. This should be straight forward.
Now to remove the old gasket is an exercise in patience and tiny progress… at least at first. I recommend using a pry tool to wiggle your way onto the edge and attempt to pop part of the ring out. If that doesn’t work, use the tool to try to loosen the outer or inner parts of the ring around the entire circle. A screw drive may help as well. I found scoring the ring using a box cutter was also effective.
If it’s really, really bad, you may need to resort to using a hammer with a screwdriver to, basically, destroy the ring in one small section. If you can dig into the gasket, and break off a small part, you’ll then possibly be able to pop out the rest in pieces.
(As a last resort if you absolutely can’t remove the gasket and it’s a lost cause you can order a replacement group head and spacer for about $125 USD from Pasquini).
This is the least fun part of the whole process. At least in my experience. But when you finally do remove that stubborn old gasket you’ll get a shot of adrenaline and DIY satisfaction. You did it!
If your Pasquini is older, you may need to use some shims.
Pasquini explains it on their web site. These are spacers that sit on top of the group gasket to account for wear over time. They suggest 1 shim for machines that are 3-5 years old and 2 shims for machines that are 5-10 years old.
Let the Soaking Begin!
Okay, now that the Pasquini is disassembled, with the case and group head removed, now is a good time to get soaking.
This is where Cafiza cleaner comes in. My understanding is that’s it’s similar to baking powder or maybe even Oxyclean. People swear by this product so I bought some from Amazon and I’m certainly glad I did.
I recommend heating up water in the microwave (to near boiling) and adding Cafiza per the instructions. Then soak everything: portafilter, group head, shower screen, shower head and maybe even screws if needed.
I left my stuff soaking for about 30-60 minutes depending on the particular component. Every now and then I’d use a coffee brush to scrub away and loosen hardened debris.
Install the New Gaskets and Re-assemble the Pasquini
When everything is nice and clean you do everything in reverse.
Install the two new gaskets.
Attach the shower head and screen with a screw.
Re-mount the group head using the hex key and 3 bolts.
Ensure the portafilter clocks in correctly before putting the case back together.
Slide case back on top, and attach with the two screws.
At this point I recommend doing a backflush with a blind basket using 3 grams of Cafiza. Follow the instructions. You’ll do a 10 second shot 5 times in a row. Then remove and clean the portafilter with a blast of hot water from the machine. Then repeat that cycle. Then you should run a bunch of water through the machine into, say, a measuring cup to ensure all residue is removed. I found this worked wonders on my Pasquini.
Enjoy Amazing Espresso From Your Pasquini Livia 90
And that’s about it. Pretty much a straightforward process. Nothing groundbreaking here, but I thought I’d at least add to the internet resources on this topic in case others were attempting to do the same and accumulating research before taking on the task.
As for the machine itself I am blown away how reliable it has been over 18 years of near daily use. Absolutely rock solid. With wonderful espresso shots every time — well almost, there’s still the human element that can cause variation in grind, tamping and other technique.
Recently, I had a chance to test a Jura Z10 super-automatic. Amazing machine… er, oops, appliance. One-touch espresso and milk-based drinks on demand. Results are great, and the Jura looks super slick and modern. But, as a friend once told me, these supers are, yes, convenient, but they’re also “soulless”. I always remember him using that word. I can see why. When I had my Pasquini all polished up and back up and running, it gave me an adrenaline rush. And I know operating it can be challenging at times. I don’t always get the shot right. But to me it’s sort of like driving a lovely 1970’s or 1980’s Lamborghini, cool switch rockers, analog tactile feedback and all. This is a special experience. (side note: to my knowledge Pasquinis do not catch on fire).
Clint’s Picks for Best Semi-Automatic Espresso Machines for 2023
Just some of my favorite espresso machines on the market today, in no particular order. Essentially, we are spoiled. These are all amazing. Minor feature differences and aesthetics, and budget, will likely drive your buying decision if you’re in the market today. You can’t go wrong here.
- Gaggia Classic Pro RI9380/46 $449 (because this Italian legend absolutely must be on any espresso short list!)
- Profitec Go $999 (PID and pressure gauge, very nice)
- Profitec Pro 400 $1,599 (awesome, but footprint and workspace may be too narrow)
- Profitec Pro 500 $2,099 (I think I’m a Profitec fan?!)
- Rocket Espresso Appartamento $1,850 (to me, a modern day, no frills version of the Pasquini Livia 90)
- ECM Mechanika V Slim Espresso Machine $1,649 (another excellent heat exchanger option. but also may be too narrow)
My absolute pick? If I were forced to just choose one if I were buying today? I would again go the heat exchanger route and this time with the ubiquitous E61 group head, the perfect combination of speed (brew and steam at same time) and relative value:
Profitec Pro 400
Well, this is not easy. After watching more YouTube espresso videos, and considering the price difference I changed my mind! Given I only make one or two drinks a day, I don’t mind the single boiler wait for steaming (it’s short!). I’d instead probably go with this one and put the $600 difference in budget towards a good grinder:
Profitec Go
If I were doing it all over again today, I’d probably short list the Rocket Appartamento, the Profitec Go or 400 or 500, maybe something by ECM, or the Lelit Mara X. Really tough, yet compelling, choices. But, I also think if you happen to find an old Pasquini Livia 90 on eBay or somewhere lost in a basement, I’d really give that careful consideration as these are, in my estimation, iconic and relevant pieces of espresso history that produce every bit as good a shot as their past and current contemporaries.
For Music~Puccini
For Art~Bernini
For Espresso~Pasquini