You’ve probably heard many times before on your videography adventures that sound really matters.
Chances are if your YouTube videos are hard to understand because of poor audio quality you’ll lose viewers and minimize your chances of increased subscriber counts.
So what can you do to get better sound on your Vlog, wedding, music and travel videos?
Fortunately you don’t need to spend a lot — results typically come from hard work, mistakes, and practice.
Below are 10 tips I’ve learned over the past 14 years making videos for Stark Insider, not just for YouTube, but for other sites like Vimeo, Facebook and Instagram, and “offline” projects designed to play on theatrical projection systems onto large screens.
Essentially, across the board it’s the same thing: sound is at least 50% of your production value.
Your viewers might not notice good sound design (though they’ll certainly notice when it’s bad), but whether they know it or not, the result will make for a better experience.
Top 10 Tips:
Better sound for your YouTube videos
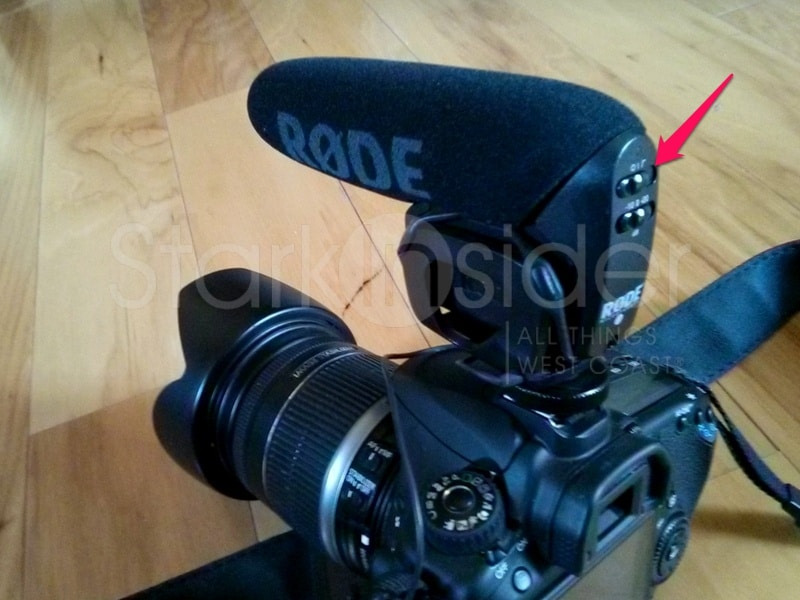
1. Buy a shotgun microphone for your camera
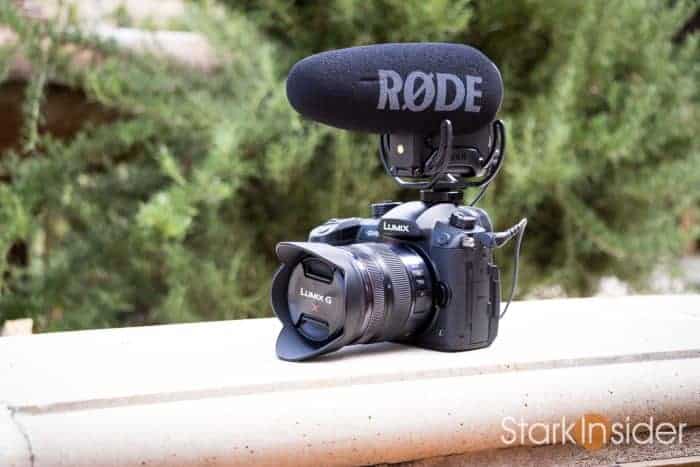
Chances are the built-in microphone in your DSLR or mirrorless camera you are using to record YouTube videos is not very good. Yes, it can capture what some call “scratch” audio — you can use it if needed in emergencies, or to sync sound if you’re using other recording devices (see below), but for primary sound capture it won’t be good enough. Instead, get a shotgun microphone. Plug the 3.5mm jack into your camera’s input (make sure it has one before buying a mic!). The difference should astound you. I like Rode and recommend their mics to beginners and experienced shooters alike. Inexpensive and high quality gear.
2. Lavalier microphones are essential for interviews
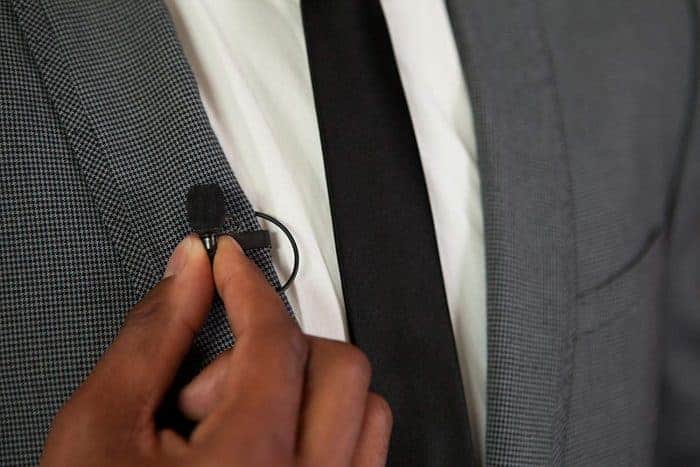
You always want a microphone as close to your subject(s) as possible. In the case of a sit-down interview you typically have 2 choices: a boom microphone or a lavalier microphone. Booms are handheld and require an operator making them tricky for single person operations, which most of us are. So instead lavaliers are ideal. These are the buds that you attach to someone’s shirt or blouse. Again, for me Rode also makes good lavs. You should try to hide the wire when possible. But where do you record into? You could use a long cable and run the jack directly into your camera. Or, if you need multiple lavaliers for multiple people read on to #3…
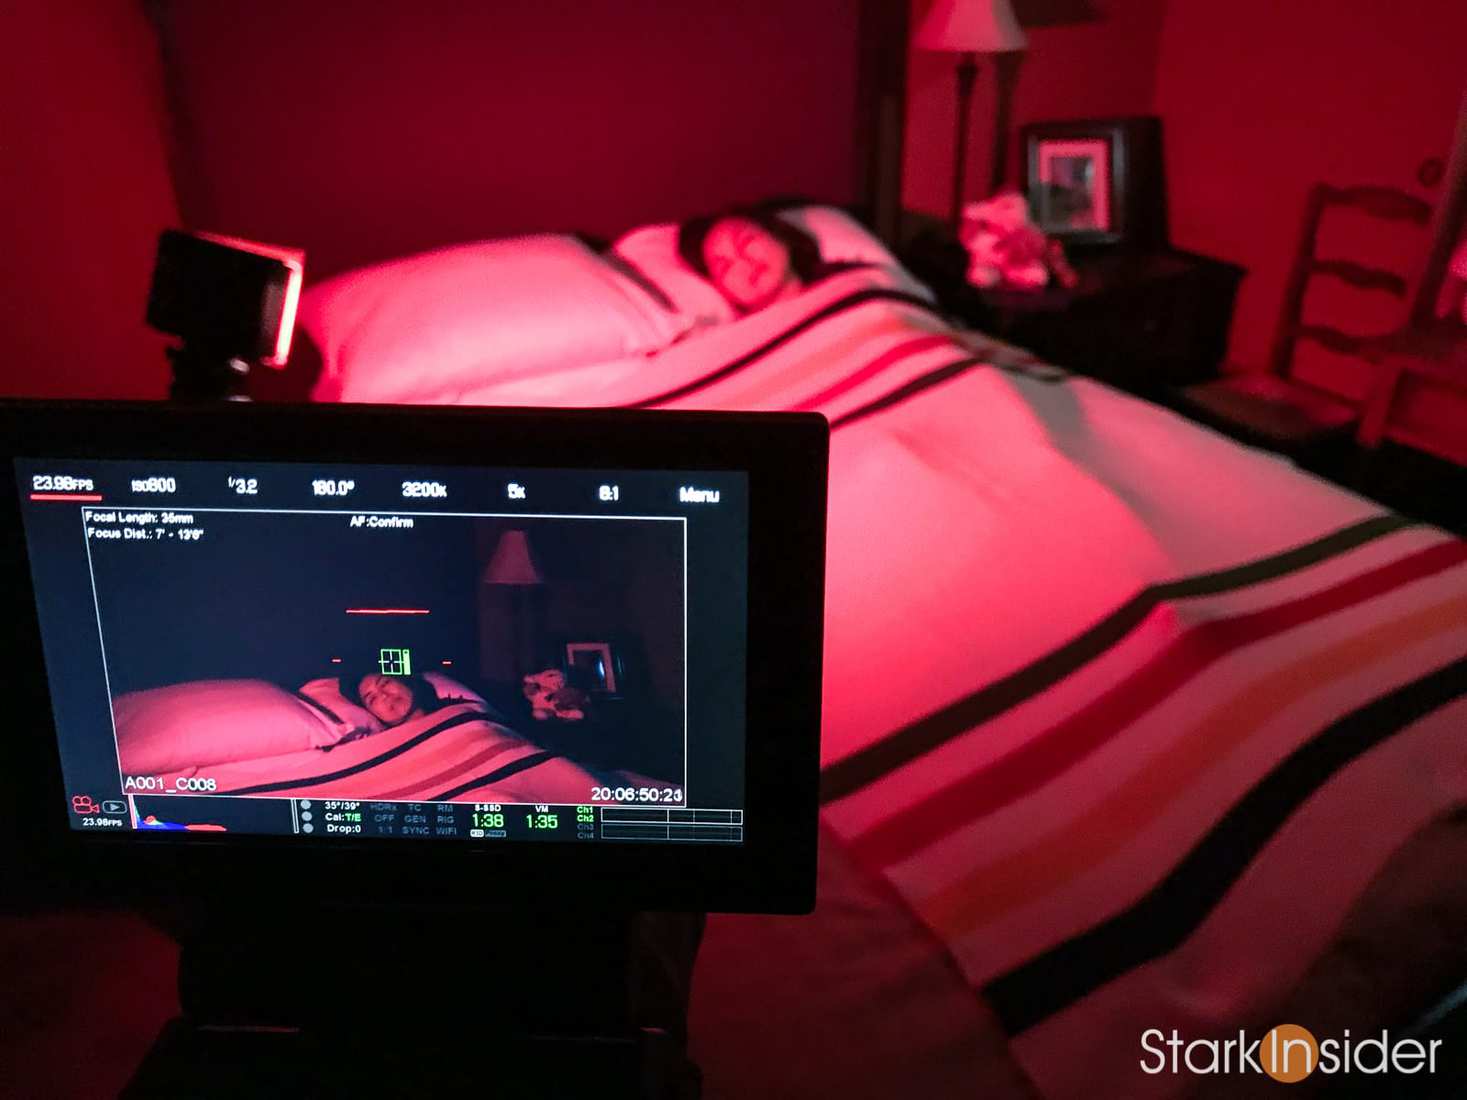
3. An external recorder opens up lots of possibilities
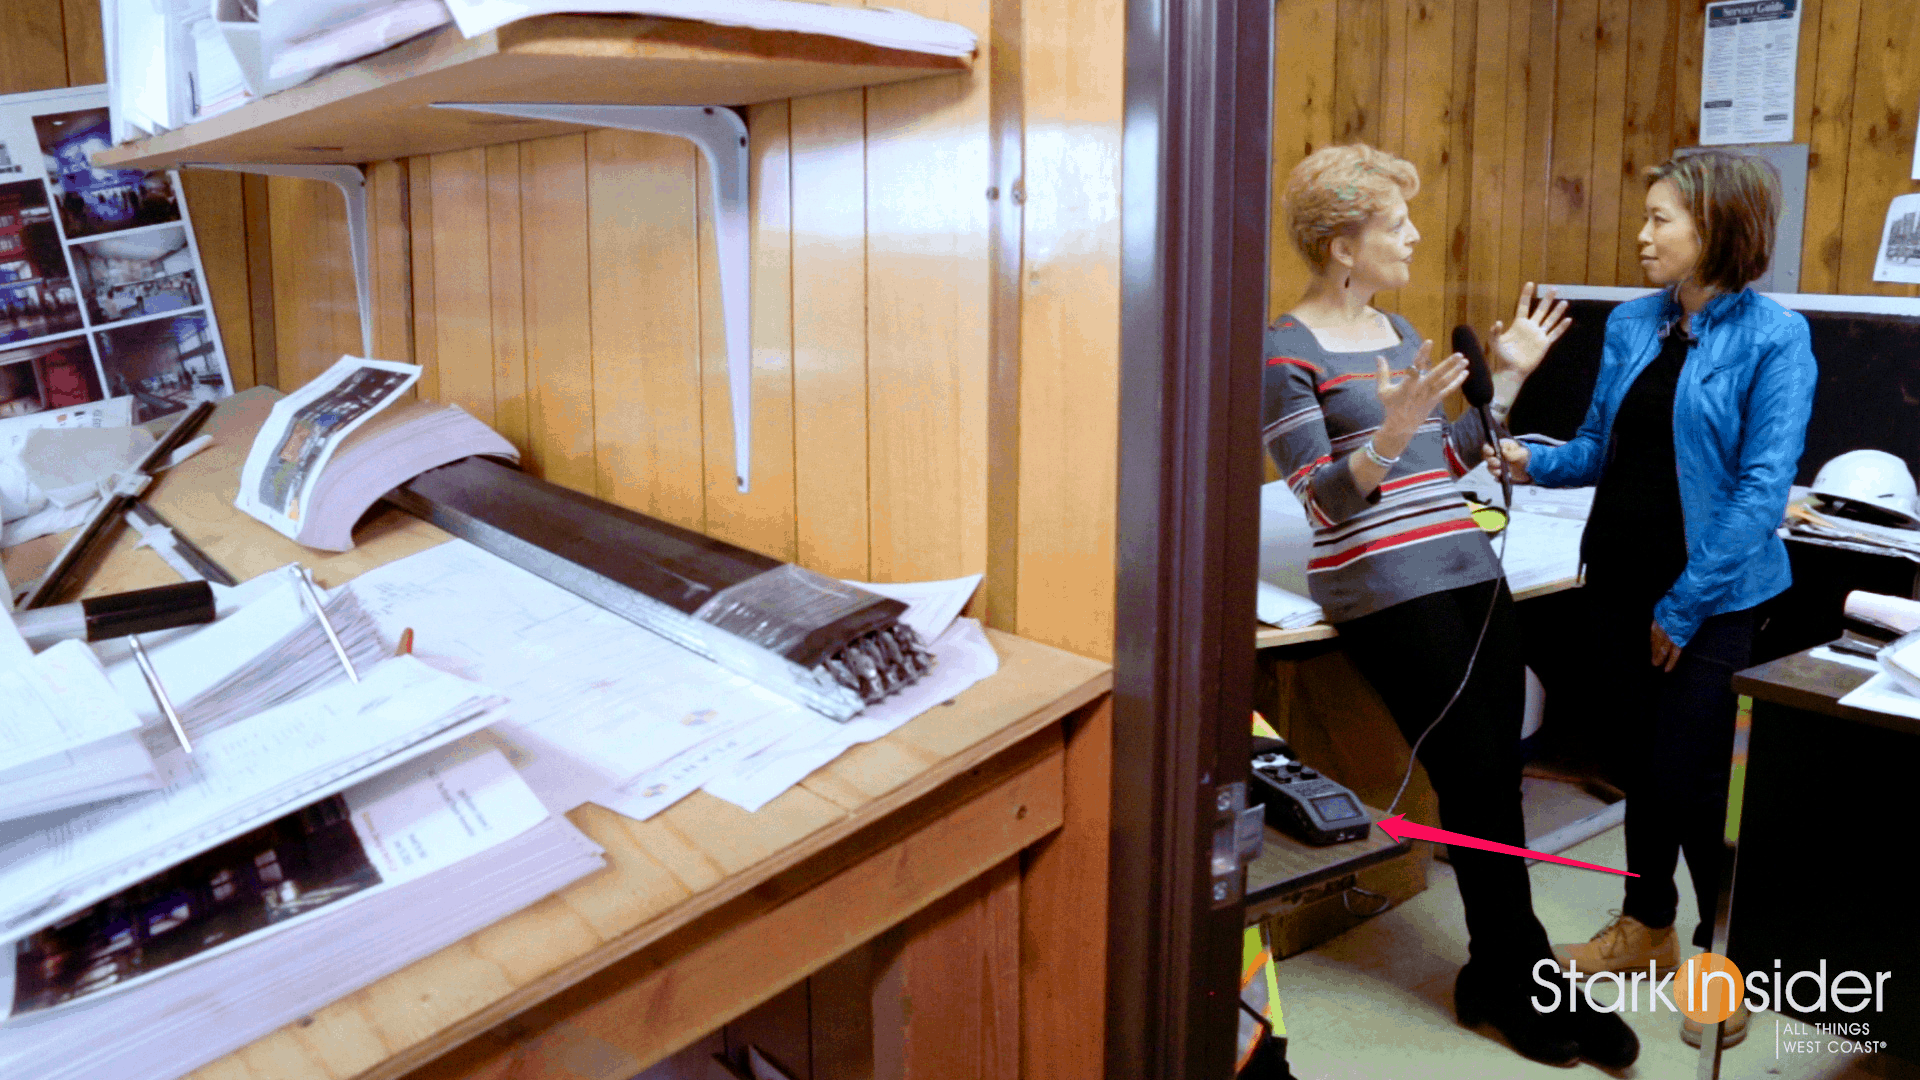
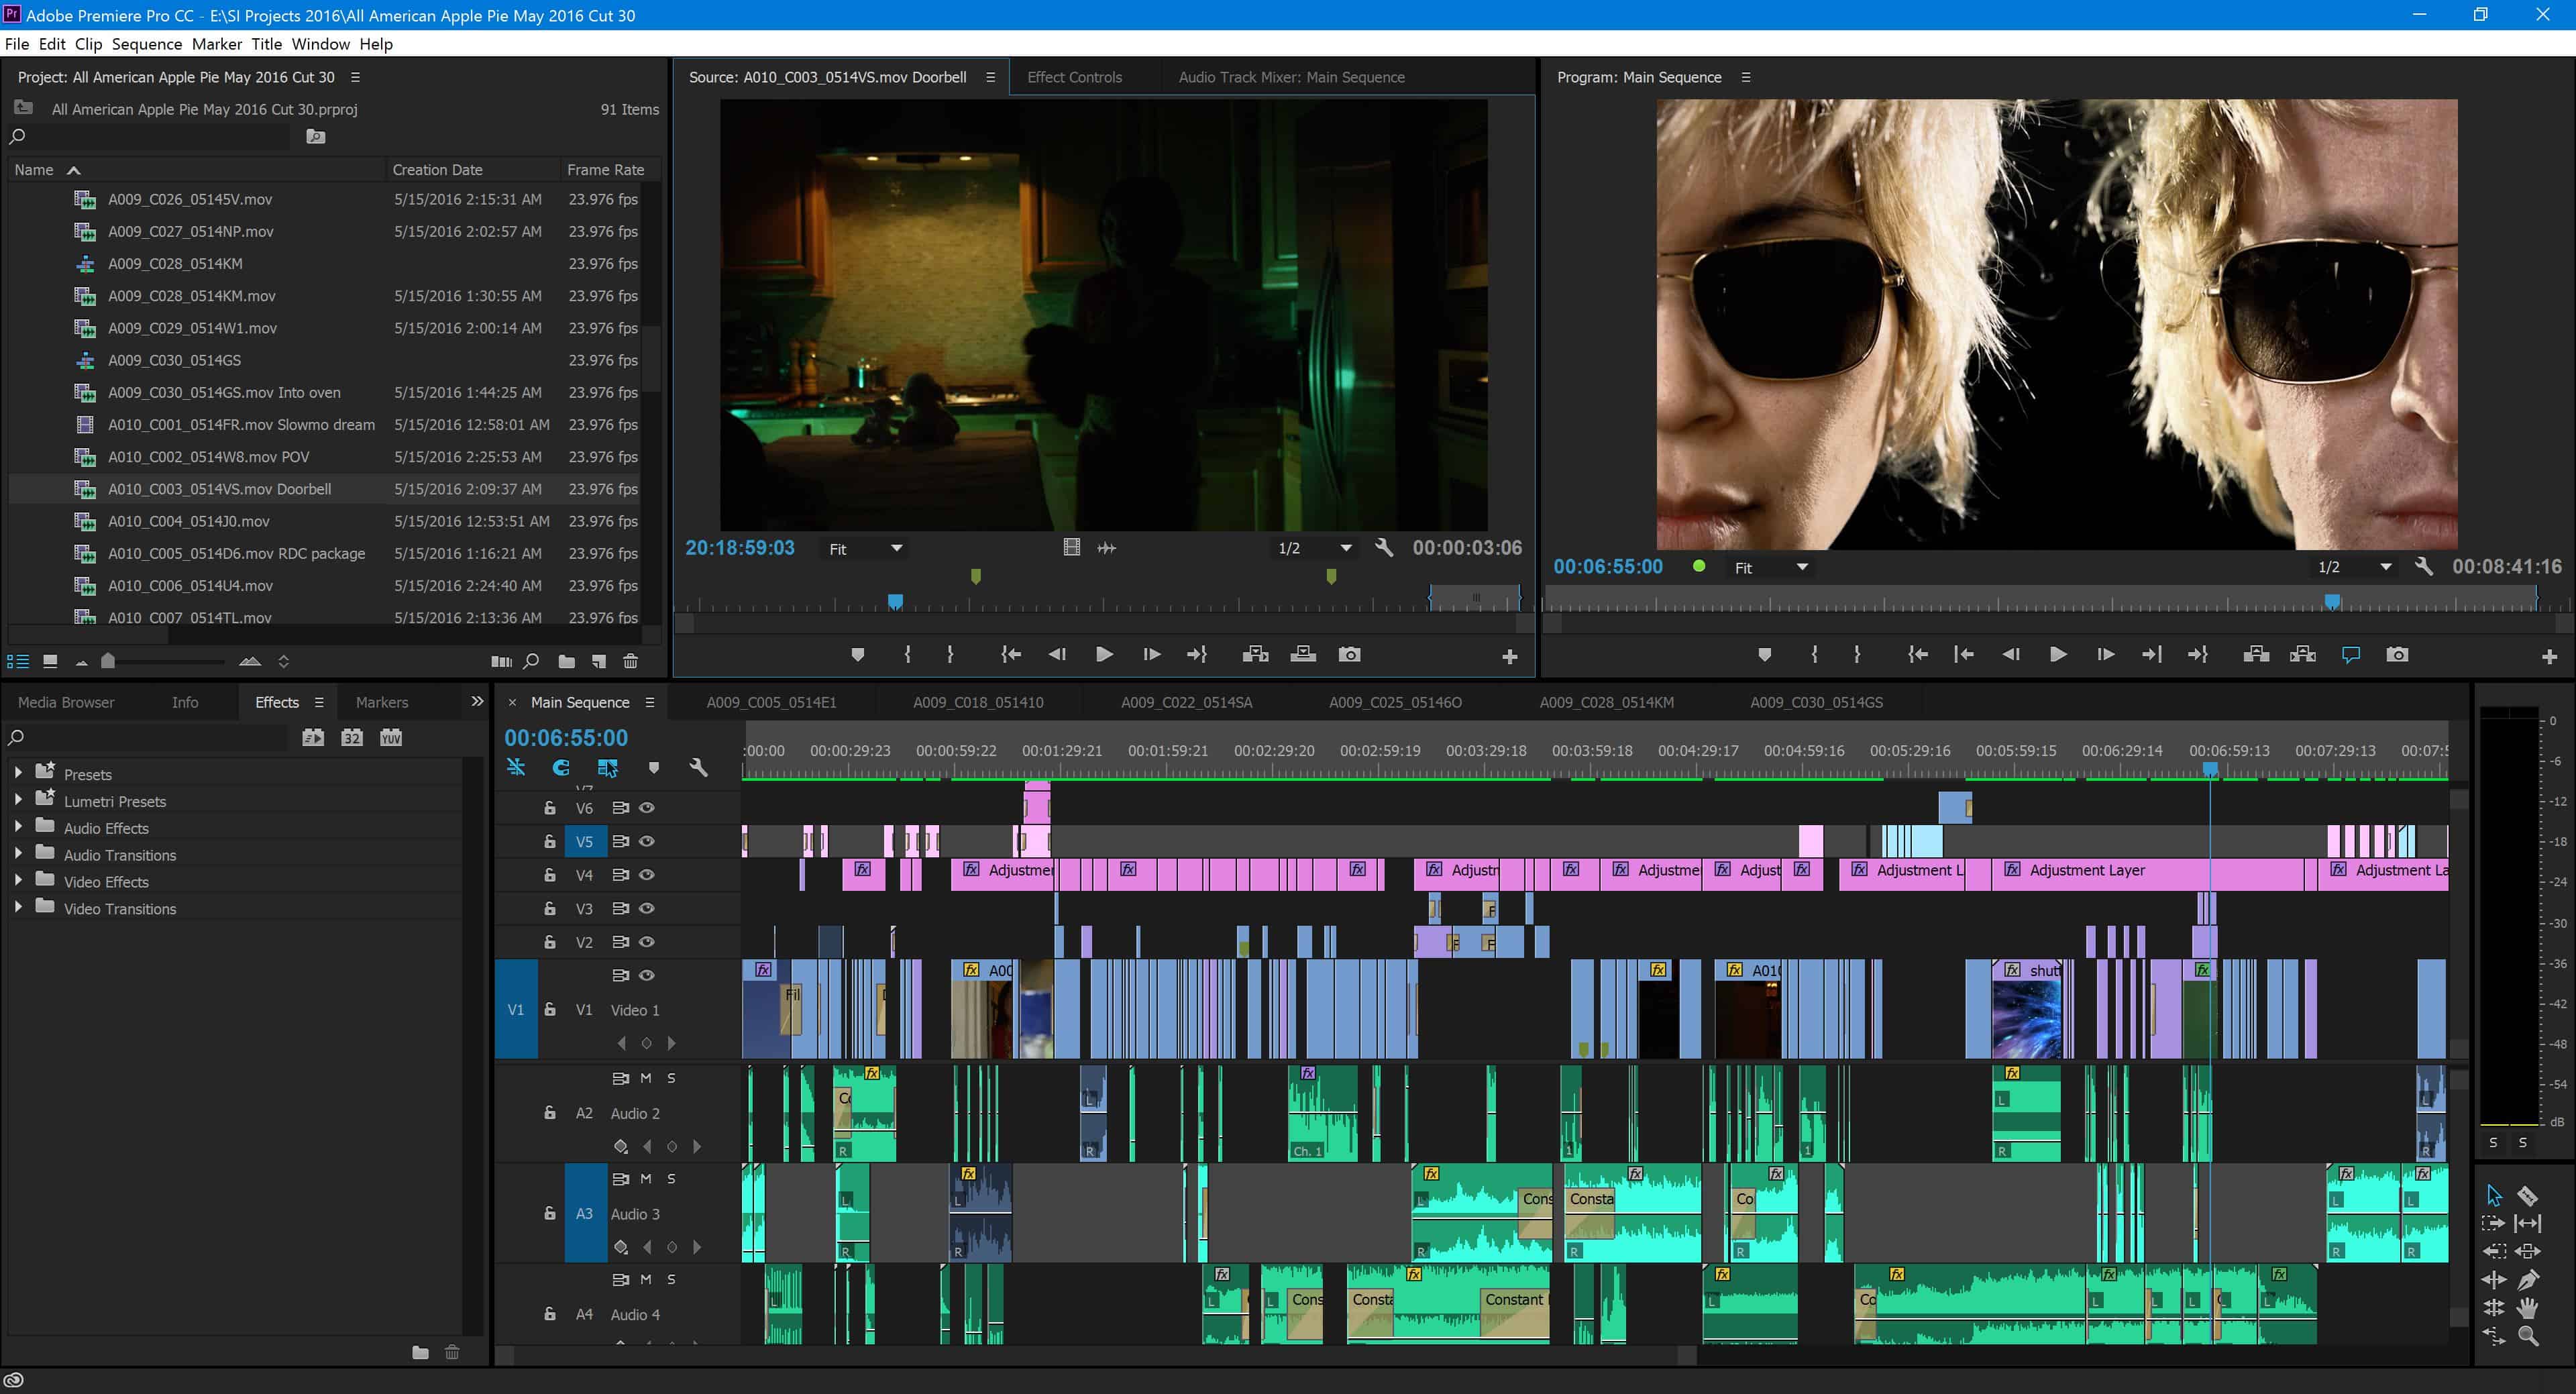
With an external recorder you get more flexibility for capturing high quality sound. I really like the Zoom H6 (they also make a lower cost model which is also excellent). These are handy because you can connect multiple microphones. These use professional XLR audio connectors. That means you’ll need to make sure any mic you use also has an XLR jack. The extra effort could be worth it, as XLR is what the pros generally use. Another point to keep in mind: when using a recorder you’ll need to “sync” the audio with the video. That’s an extra step. But most most editing software these days can do it for you automatically.
4. But don’t forget about your iPhone or Android phone
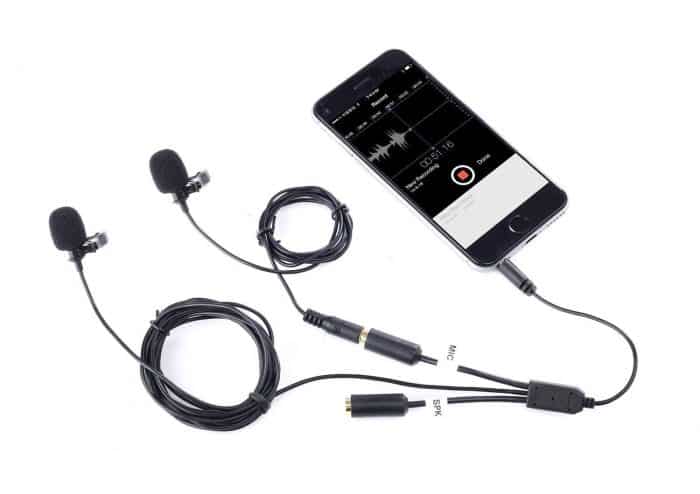
A lot of times all you’ll really need is your phone. Add a few accessories, such as a lavalier microphone designed for your phone, or even a special lens and app, and you might not even need to lug around a separate DSLR camera.
5. Learn about the High-pass filter
You don’t want deep buzzing or humming in your videos. Eliminate that and the important stuff like voices and music and ambient effects will come through cleaner and richer. To help, if you don’t already know about it learn about the High-pass filter. Simply this is a switch or effect that cuts out low humming. It simply only allows sounds above a certain frequency “pass” through. There’s more online you can look up to learn details. Just know that this function is typically built in to microphones and recorders where it can be turned on or off. You can also find the effect built in to your editing software, so if you didn’t use a high-pass filter when recording your sound you can always use it later during the edit.
6. Room tone
Room tone (presence) is essentially the sound of a room when no one is talking. If you shoot a lot of interviews this is something you’ll want to research. At the beginning or end of a shoot you should capture some room tone on to whatever recording device or camera you’re using. That way, later you can add a layer of room tone to your edit. Why bother? This room tone or white noise, in essence, provides a smooth pad to which your edits will appear more seamless — it basically reduces or eliminates the changes in background sound when you cut from person to the next. This is just my (very) elementary explanation. Google a bit and bone up on room tone, and chances are you’ll take your game to the next level. Just one more trick you’ll have in your playbook.
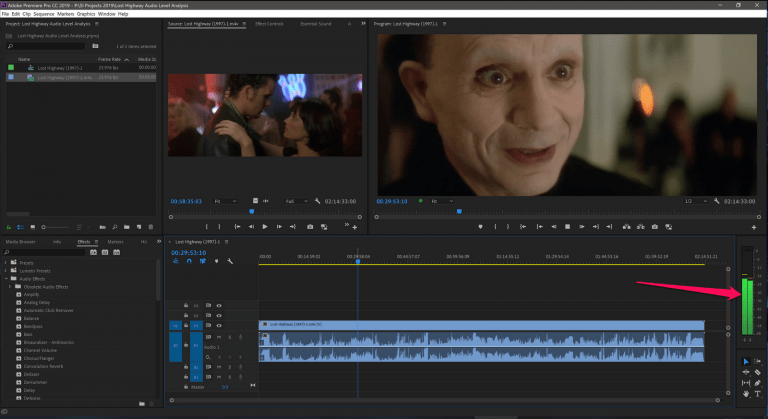
7. Dial down the background music and use audio meters during the edit

Don’t go too crazy with background music. It’s a mistake I’ve made too many times over the years here on Stark Insider. I recommend aiming for around -24db to -30db. You can watch audio meters to measure the signal and adjust the volume levels accordingly. Although there’s obviously science involved here, mixing sound is truly an art form. So use your ears. Experiment. Basically you don’t want the viewer to be distracted by background music when their attention should be on the dialog. Of course, there are times when you do want to boost the music and effects. For Vlogs, YouTube interview and those sorts of videos I’d dial back the background music and try to stick to the message.
8. Ducking
Okay, getting a little more advanced here and keep in mind I’m not a sound engineer. Rather I’m just a guy who edits videos and increasingly want to get better and better results, and that has meant in recent years focusing on sound.
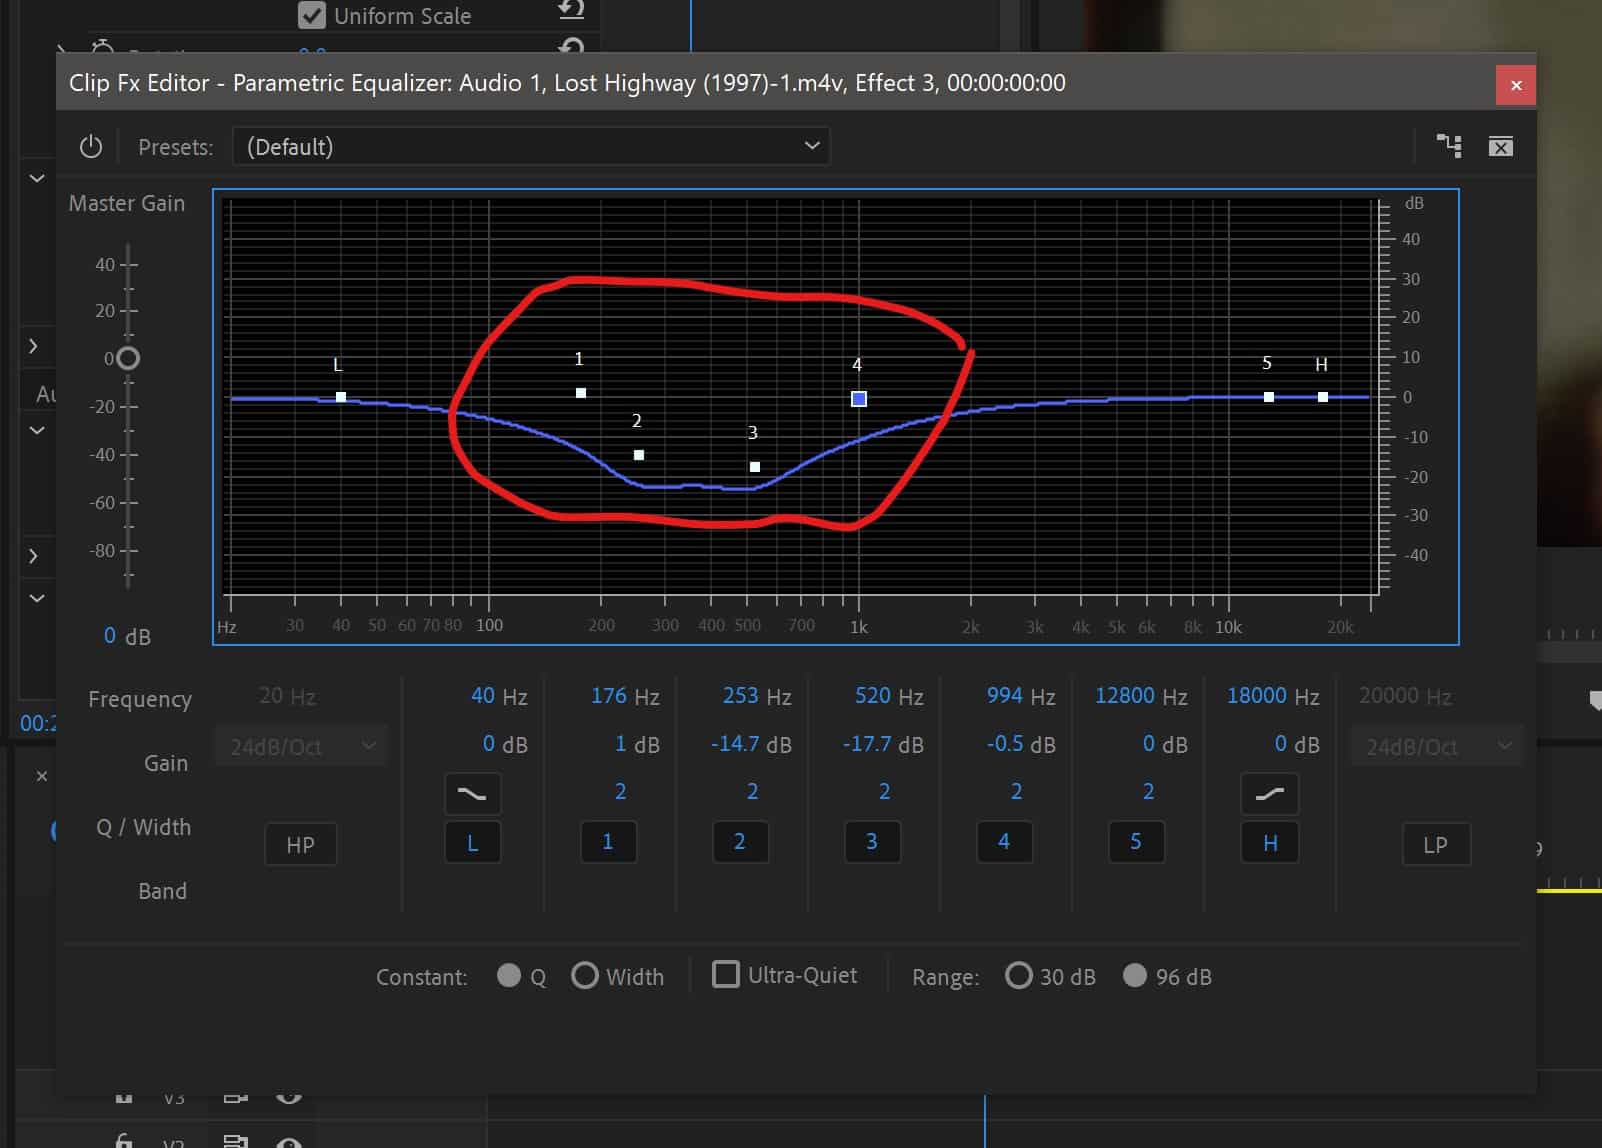
Ducking is when you lower music and effects — duck — to make room for dialog. But you don’t lower the volume of everything else. Rather, you use equalization (EQ) to cut out or lower the frequencies where the human voice resides. So essentially you still have the bass and the bright spots of everything, but are making room for dialog. Basically this is a terrible explanation. But I can tell you that it’s worth learning about the concept, and trying to apply it to your videos. You may not always need to or have the time to painstakingly go through the process, but for your higher end work, you’ll find that proper ducking can really integrate dialog and voiceover into a busy mix and produce slick results.
9. Apply sound normalization (LUFS) during export
And again as we get lower in this list of audio tips we’re getting more advanced and perhaps for most into the esoteric.
During export you can optionally apply sound normalization to your project. This means that audio will be smoothed out as needed so there’s no sudden jumps in volume. There is a concept called LUFS. It’s another term that you should Google and learn about as you dive deeper into generating better audio mixes. If you have already mixed your sound perfectly (just like David Lynch!) then you won’t typically need to apply sound normalization — in fact it could possibly reduce your overall dynamic range which you’ll want to avoid. In any case LUFS and sound normalization are additional concepts at least being aware of, even if you plan not to use them. Just like an image has dynamic range (shadows and light), sound does also have dynamic range (booming bass and sparkling treble).
10. Practice and get feedback from friends and family and your YouTube fans
I’m not a YouTuber or Vlogger (I dabble in shorts and experimental stuff), but if I were I’d turn to them for feedback on the quality of your sound mix. If they aren’t commenting about problems (background music sucks!) then you’re probably okay. Aside from your subscribers, also, of course, ask your family and friends for feedback. This is especially helpful for a really critical time-consuming project like a wedding film, music video, documentary or short film. But… in the end you should make the final call. Feedback is feedback. You should always welcome it. Weigh it carefully, however, and try to make informed edits based on your intended goals.
Conclusion: Make mistakes fast and often, and learn, move forward
There you have it. 10 quick and basic tips for hopefully improving the sound on your YouTube videos and other video-related projects. Be it a short film, documentary, travel video, social media viral video, narrative project or old fashioned sit-down interviews, you should be able to take your audio to the next level. Once you move beyond the basics, you can Google and dive even deeper and learn all sorts of interesting tricks.
2017 Short Film Collection: Who is Stark Insider? (VIDEO)
Top 10 Tips:
Better sound for your YouTube videos
1. Buy a shotgun microphone for your camera
2. Lavalier microphones are essential for interviews
3. An external recorder opens up lots of possibilities
4. But don’t forget about your iPhone or Android phone
5. Learn about the High-pass filter
6. Room tone
7. Dial down the background music and use audio meters during the edit
8. Ducking
9. Apply sound normalization (LUFS) during export
10. Practice and get feedback from friends and family and your YouTube fans

If you’re like me you’ll make plenty of mistakes. No worries, as they say. Just learn from them, and move forward as fast as possible. Thick skin, eh?
ALSO SEE: Top 3: Must-have accessories for your new DSLR or mirrorless camera
Happy shooting!
Clinton