When it comes to shooting video with a compact, relatively affordable DSLR camera they don’t come much better than the Canon EOS 70D.
I’ve been shooting professionally with the 70D since its launch. Before that I used the (decent) 60D, and earlier the (milestone) Rebel T2i, still highly capable after all these years.
The 70D has not once failed me in the field.
With the right glass the EOS 70D takes superb photos. But its real party trick is video.
Hint: you may want to bookmark this page and comeback later, and digest/practice a little at a time with each of these tips — I’m going to cover a lot of ground in a short amount of time.
SHOT ON 70D by Clinton Stark: Priory Live in the Vineyard
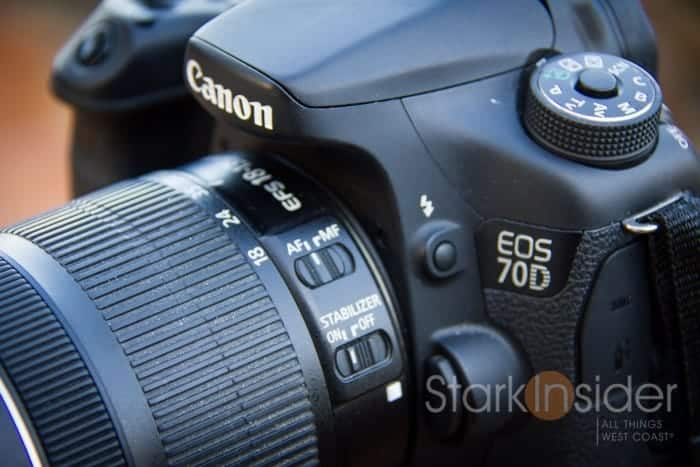
The well engineered Dual Pixel auto-focus — a Canon exclusive — is a real treat. Tap the fold-out touch screen and you can target precise focus points. From there the 70D will automatically track subjects, and even use face recognition to keep a person in focus throughout the frame. It’s quite magical.
You might hear that auto-focus and video are two words that should never go together. Perhaps. Maybe if you’re David Fincher shooting Gone Girl with RED cameras and a crew of hundreds (including dedicated focus pullers), but for the rest of us, auto-focus can be indispensable for one-person, and run-and-gun situations.

I’ve used the 70D to shoot backstage Broadway videos, interviews with actors and directors, concerts (e.g. Live in the Vineyard in Napa), film festivals, travel features, and more. When I want to be discrete, I grab just the body and lens (usually the highly flexible Canon 18-135mm STM kit lens), and cradle the camera against my abdomen for makeshift stabilization. For planned shoots, I rig it up — add an LED light panel, shotgun microphone, and tripod (or some other form of stabilizing accessory).
A few other great things I’ve discovered after shooting hundreds of videos with the 70D:
— battery life is very good (each lasts about 45-60 minutes);
— it uses MicroSD cards for storage which are very cheap and quite reliable;
— low light operation is not bad if you use the right lens (try the amazing Sigma 18-35mm… thank me later!);
— thanks to the Canon EF mount, there are a lot of lens options — from inexpensive 50mm primes all the way up to full-blown cinema lenses (don’t ask about the prices);
— convenient buttons located along the top and rear of the camera (ISO, f-stop, AF lock, etc.) make for quick operation — you don’t have to dig into menus to make on-the-fly adjustments.
Whether you’re shooting video of a birthday, wedding, or soccer game, or stepping it up and shooting a music video, short film, or concert, the EOS 70D should be on your short-list of contenders.
SHOT ON 70D by Clinton Stark: BTS Addams Family Musical
Keep in mind, that Dual Pixel AF feature I mentioned is similar (if not even better, thanks to the touchscreen on the 70D!) to what you’d find on the Canon C100 Mark II. That’s an entry professional cinema camera that sells for $5,500. Yes, of course, it does more, but you get a lot of the continuous auto-focus capability found on the 70D… for far, far less money.
With all that said, here’s 5 tips I wanted to share if you plan to shoot video with the 70D:
1. Shutter Speed 1/50, Frame Rate 23.98fps

First things first. If you want to get the most “filmic” look when shooting with the 70D (which I always do), switch the camera into manual mode (rotate the dial to “M”), and then go into the menu to change these settings as follows:
Shutter speed = 1/50
Frame rate = 23.98 fps
Generally you want the shutter speed value to be twice that of the frame rate. If you plan to shoot 23.98fps — again, the best setting for a film-like aesthetic — you’ll want the shutter at twice that, so, in this case, 1/50 would get you the right timing.
This are the settings I use. Of course, you might want to go with higher frame rates for different applications and looks, and the 70D offers plenty of combinations in this regard.
Another 70D settings tip:
Manually set ISO! If you leave ISO in “Auto” the camera will adjust it automatically as you shoot video. This might work. But, more often than not, you’ll notice abrupt changes in exposure when using auto-ISO. For most situations I recommend you set it manually, and adjust as the scene dictates (this is easy with the 70D because a dedicated ISO button sits on top right near your index finger).

2. Run-and-gun Lens: Canon STM 18-135mm
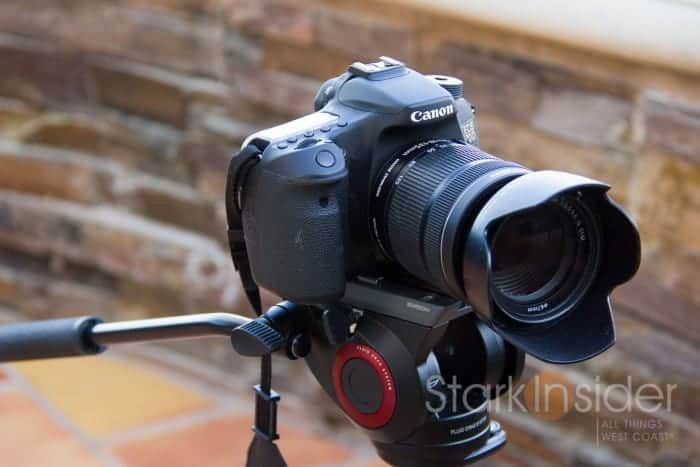
If you’re like me, most of the time you don’t have the luxury of switching lenses. Time is of the essence. And you want the best all-around lens at all times; one that allows you to get a long shot (wide angle establishing shot of an exterior, for example) and also one that can get in tight for added drama and viewer interest (perhaps a close-up during an interview).
5 Tips for shooting video with the @Canon #EOS70D via @StarkInsider! #filmtips #filmlife http://t.co/Yko2qs0357
— zacuto (@Zacuto) September 29, 2015
In my experience, the best bang-for-the-buck all around for shooting video with the 70D is the Canon STM 18-135mm. That “STM” designation is important. It stands for “Stepper Motor” and in practice means the focus mechanism is near silent, and that this particular lens works particularly well with the Dual-Pixel AF found on the 70D. For the price, it’s amazing. If you plan to buy the 70D, you can buy a kit that includes the 18-135mm, a good way to save a few dollars.
Done and done. One lens to rule them all.
Highly recommended lens for shooting 70D video: Canon EF-S 18-135mm Zoom Lens
3. Capture Pro Audio: Rode Video Mic GO

Like most DSLR cameras, the built-in microphone on the 70D is not very good. It’s okay for casual, ambient sounds, or “scratch” audio, but not something you’d want to use for an interview or event where audio quality is important.
If you plan to shoot a lot of video, do yourself a favor, and pop on a shotgun mic. My favorite is the Rode VMGO (Video Mic GO). At $150 it’s (really) inexpensive, and produces rich, quality sound that belies its price-point. The mic slots into the hot shoe on the 70D, and a small, coiled cable runs into the 3.5mm audio input port on the 70D’s left side. Amazingly enough, you needn’t worry about battery. With this new model, the mic runs off the camera’s plug-in power — no battery needed! That is pretty sweet.
Highly recommended shotgun mic: Rode Video Mic Go On-Camera Microphone
4. Let There Be Light
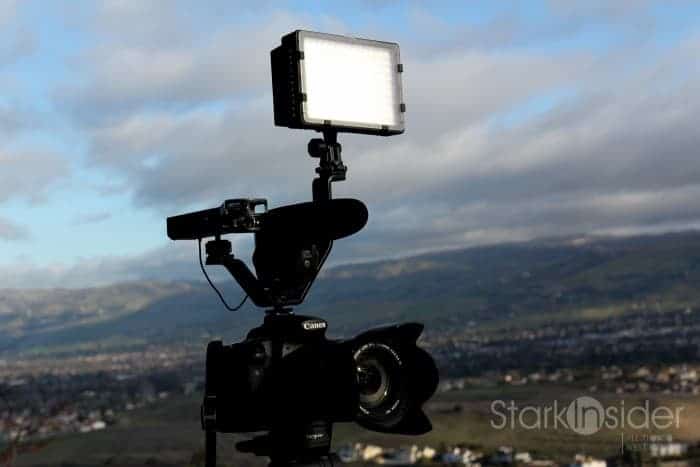
Most of the time, I recommend using natural light. You’ll get beautiful color rendition, natural looks, and a high quality aesthetic; that is, if there’s enough light. When there isn’t, you should consider a small LED light panel. In dark and near-dark situations you’ll be thankful to be able to light up the scene by simply turning on the LED. The one I like to use has a variable knob to control the light level. Using your judgment you can gently brighten a subject with a tiny bit of light, or you can go hells-bells and light up an entire wine cave (done that!) to capture some drilling drama. PS- I also once inadvertently blasted actress Patricia Clarkson with this light at a film festival and she politely asked me to stop blinding her (!).
Your camera light source should match the environment. If you’re shooting indoors, for instance, you’ll generally want a warmer color (3200K), unless lighting is florescent. Outdoors, you’ll typically want cooler tone (5600K). Make sure the LED panel you’re considering has an adjustment for temperature, and make sure to use correct setting.
I used to use cheap off-brand Chinese light panels. I saved a few bucks, yes, but I paid the price with horrible color cast. It was near impossible to correct in post-production. Just be wary of that. You think you might be saving, but in the long run you could be ruining your shots. I recently bit the bullet and stepped up to a Genaray panel. Excellent stuff! Let there be light, indeed.
5. Advanced 70D Video: Shoot in LOG using Technicolor CineStyle
My last tip is for advanced users, or for those who really want to push the performance of the 70D when shooting video.
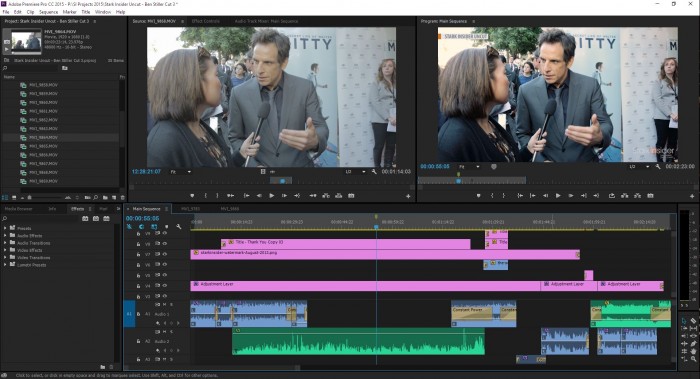
Shooting in what’s called “LOG” mode produces a flat picture, one that looks de-saturated, and quite lifeless. You’ll need to process the image in post-production using software. I use Premiere Pro, and a plug-in called FilmConvert.
SHOT ON 70D by Clinton Stark: Nightwalk San Francisco
Why bother shooting in LOG?
The theory, at least, is that you’ll get extended dynamic range — meaning, you’ll see more details in the highlights, and also see more in the shadows. You’ll ultimately reveal more detail from the image. Possibly. There’s a lot of things to know when shooting in LOG, so you’ll need to do more research and practice a lot. One thing to consider: ETTR. That is, expose to the right. This is what I do. I slightly overexpose the image. Then, in Premiere Pro, I add contrast, adjust exposure, etc. When done right, it can produce a phenomenal image that belies the low cost of the 70D. For me, it’s totally worth the extra effort.
How do you shoot on LOG on the 70D?
First, you’ll need to upload a LOG shooting profile to your camera. I use “CineStyle” which is made by Technicolor (yes, that famous company). It’s free. You’ll need to connect your 70D to your computer, and upload the file. Then, select the “CineStyle” profile in the menu (the same place you find the default profiles such as Standard, Portrait, Neutral, etc.).
[Download: Technicolor CineStyle profile for Canon EOS]
Next, shoot video.
Then bring your footage into a NLE or some sort of image processing software (like Davinci Resolve by Blackmagic Design – they have a free version). In Premiere Pro, as I mentioned, I use FilmConvert. I then use that plug-in to select the camera model (60D profiles work) and apply a film stock look to the footage. That brings the image to life. From there you can tweak away using Lumetri color correction, or whichever tools you prefer.
Yes, this is advanced, to be sure. It took my months to refine the process. After a few years, I think nothing of it. I simple create an “Adjustment Layer” in Premiere Pro, and apply FilmConvert and it’s done.
Again, this is a way to push the 70D to its limit. It won’t magically make it a $10K cinema camera, but you might find the results to be pretty amazing.
Happy shooting!