When we started adding voice-over to Stark Insider videos a few years back, it opened a world of creative possibility. Now we could accentuate a story, add personal narrative, create drama — or at least try.
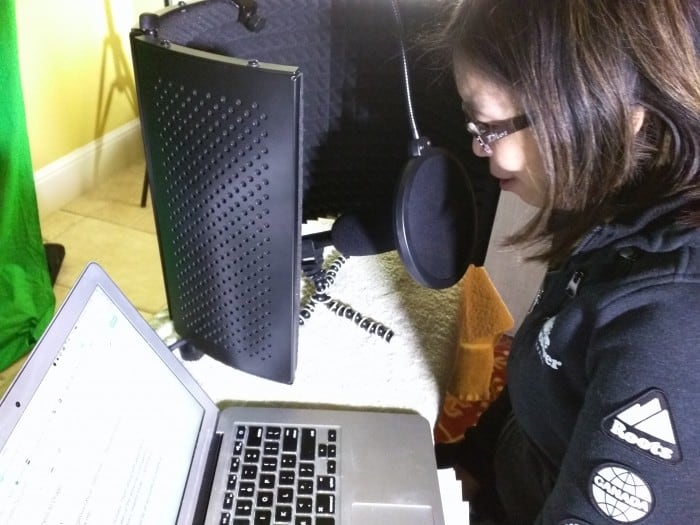
Voice-over may not always be required or even appropriate, but it’s nice to know you have the choice, and can setup your own portable studio without breaking the bank. I shot the above video while Loni was doing voice for a BTS video for a show called Odysseo.
Here’s the gear I use. All in, it’s easily under $1,000 (US). Results are, at least in my view, broadcast quality. With a little tweaking (EQ, compression/dynamics) you can really make a voice pop, or, if you prefer, integrate it subtly into the overall audio mix.
Gear: Portable voice-over studio
1. Zoom H6 audio recorder ($399)

Simply superb. That about sums up the Zoom H6 audio recorder (the same is true of the H1, H4 and H5 — all first rate). I use it all the time when I want my audio to sound great. For voice-over, I simply plug an XLR cable from the mic into Input 1, set levels, and off I go. I like that it records on low cost SD cards, and runs on 4 AAs.
2. Sennheiser MKE 600 microphone ($329)
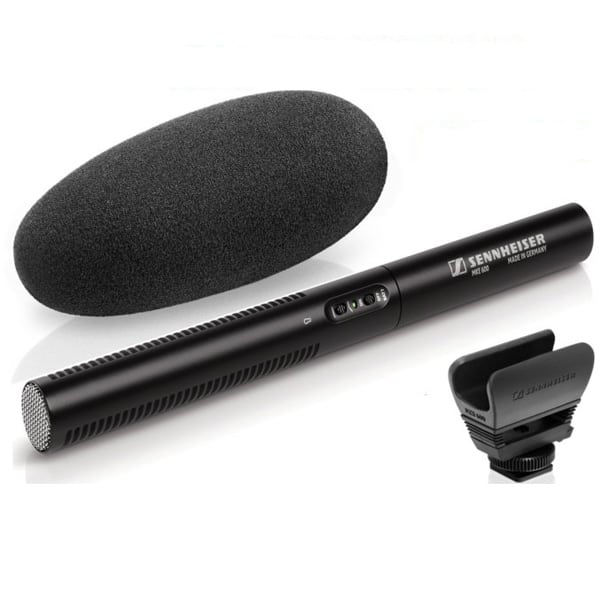
There are any number of mics out there, some that cost dearly more than this Sennheiser MKE 600. I like this one as it can double as a shotgun mic, and produces solid quality audio for the price.
3. Monoprice Acoustic Microphone Isolation Shield ($65)
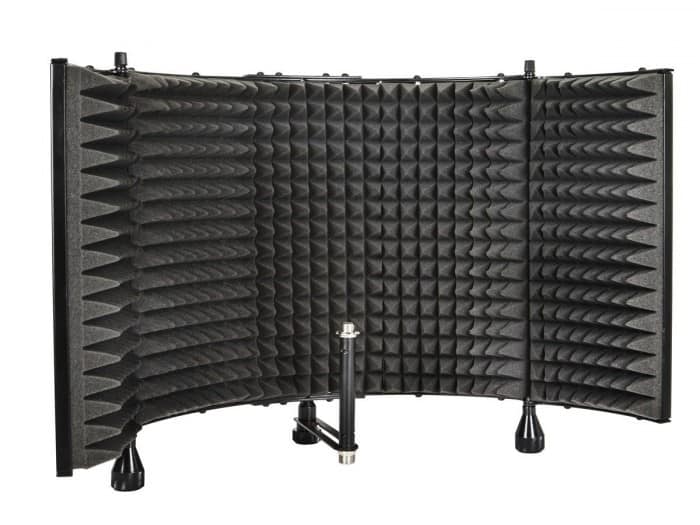
This piece is critical.
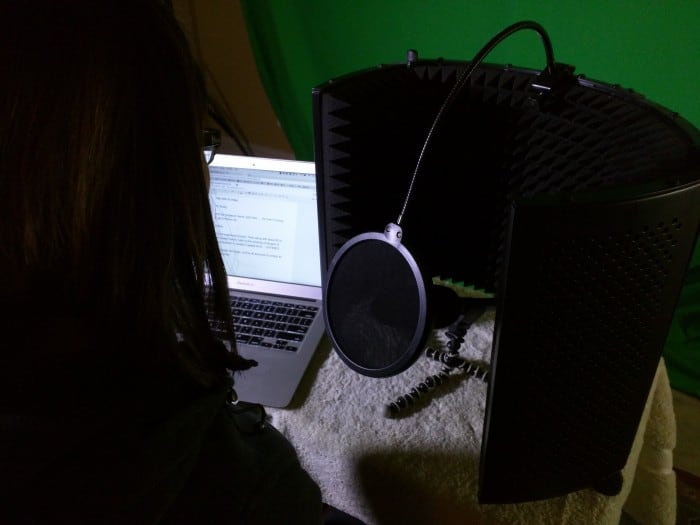
Typically, when doing voice-over work (or ADR) you’ll want to isolate the voice, and remove all background noise entirely. What I like about this shield, is it’s portability, and price. I place the mic as close as possible to the sound deadening material, and I have my “talent” as close as possible, sitting up-right with, hopefully, good posture, to get a nice breathy tone, with his S/N.
4. Pop filter ($7)
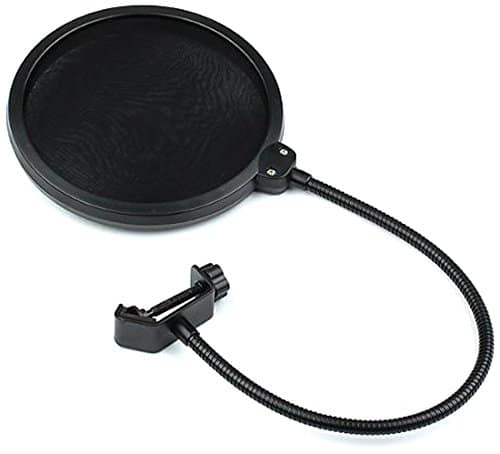
I added this later, but regret that. If you don’t use a Pop filter, you’ll likely get “pops” when hard words/letters are spoken such as “proof” or “soon” or “catch” — a pop filter takes the edge off, and prevents unpleasant audio spikes. There’s lots of Pop filters out there, here’s the one I use via Amazon.
5. Optional: Pillows… (really!) ($0)
More often than not I also place pillows around the isolation shield, and in the room as needed. The idea is to deaden all sound, and reduce potential reverb to a minimum. Note: also be sure to turn off A/C units and other electronics that might produce low hums.
That’s it!
Total cost of portable voice-over studio: ~ $800
The nice thing is that at least two of these items can be used for other purposes. For example, you can use the Zoom H6 to record a concert, or on location to record sync audio, or for a boom pole. It really is an excellent budget gadget for filmmakers. Same too with the MKE 600 which, obviously, could be used for interviews, or, as I do, mounted on a camera and used as a shotgun (an excellent one at that).
But… the hard Part isn’t the tools
Unfortunately, the best gear in the world won’t help any of us tell better stories, document travels more effectively, or somehow magically increase audience retention. Simply:
Creativity is still king.
Other things to consider when attempting voice-over:
1. The Script

You could wing it, but I prefer to storyboard/write a narrative. My partner on these videos, Loni Stark, reads them, and improvises, changes certain words to make it more personal. I then use this script as the structure for editing the actual video.
2. Timing & pacing

Then you’ll need to decide when, and how often, to embed voice-over. Too much and you run the risk of taking some of the whimsy and excitement of the action. Too little and perhaps you are risking opportunities to better inform your audience.
In my estimation the gold standard, at least in television, is Anthony Bourdain. He’s a phenomenal writer. And his team has honed to perfection when and how much to use his crackling narrative.
3. Emotional arcs and structure
It would be boring if a voice-over didn’t ebb and flow with the story line. This is a personal choice, and over time you’ll likely develop a style with enough practice, and trial and error.
Practice, Practice, Practice
As with anything in filmmaking or videography, practice is essential.
Some say voice-over is a crutch. Could be true. I don’t know. I do know that by building a portable sound booth using the above products I’ve been able to open up new creative possibilities for videos produced for Stark Insider. The sessions themselves are never as easy as I — we — expect them to be. We debate lines, words. I ask Loni to slow down, to speed up, to speak louder, to speak softer. She asks me to stop talking. And on and on. In the end, though, some how, we walk away with an audio file I can pop into Premiere and then slice and dice and add to a video.
Likely the best thing you can do is to get started, try your hand, develop your own techniques and approaches. I’m likely missing some steps here. But this set-up has served us well for the last year or so (I only just added the isolation shield last year in 2015).
With this simple set-up you can take your creativity to the next level, and hopefully also the quality of your video projects.
Happy shooting!
Examples Using Above Sound Studio
BTS Odysseo at AT&T Park
Voice-over
“Only Art Forgives”
ADR on the only bits of dialog.
Harley Quinn: Revenge at Union Square
Voice-over by Loni Stark (Harley)