Courtyards are always challenging spaces to decorate. But the rewards, as I would discover, make this particular project worth it. My courtyard has stucco walls spanning two stories on three sides, with the home wrapping around it. With this trellis you can soften the space, add interest thanks to lush, crawling plants and get a custom fit.
During the initial landscaping of the home, I had Saltillo floor tiles installed and an arbor overhead that spanned the entire width of the space. I choose to have the arbor installed 10 feet from the ground so that the area felt both spacious and cozy. It’s a very simple design with wood beams suspended across two of the courtyard walls. It defines the space while still affording generous views of the sky.
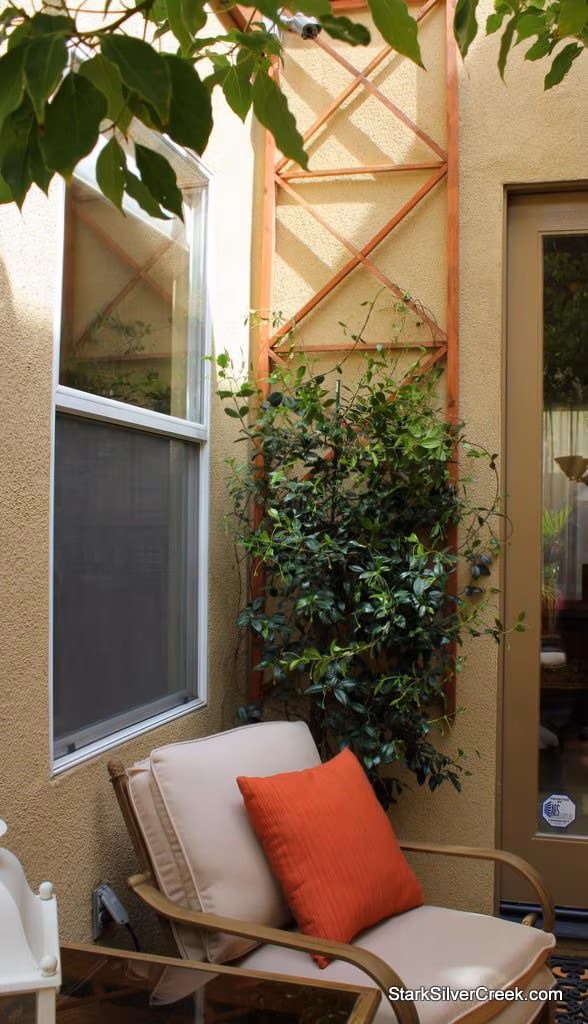
You really have to be careful a courtyard doesn’t become a concrete jungle. In mine, I have a tree in the middle and five plants around the perimeter to soften up the area. Two of these plants—star jasmines—have become unwieldy in the absence of a structure to train their growth. I wanted the plants to climb up the walls to further soften the area. I don’t like plants that are able to climb walls by themselves as many will damage paint and walls when you go to trim them.
The solution? Two wooden wall trellises.

I searched online and at garden centers for the perfect trellis for months, but could not find one that had the ideal dimensions, materials and aesthetic qualities I wanted.
By designing and building my own, I could get the perfect dimensions that would frame the area and a design to suit my courtyard space.
In terms of dimensions for wall spaces, similar to a carpet on the floor, I wanted a trellis that would comfortably fill the blank stucco wall without being too large. A garden structure that is too small would be chotsky-looking. For the particular space, I wanted two trellises that were going to be 96″ in height and 27″ in width. Because I wanted to maximize the space, I didn’t want the trellis sticking out too much from the wall. Most commercial trellises have a lattice design which requires pieces of wood being laid on top of one another. I wanted a trellis which was more streamlined.
Below is the material required; you will need to adjust this depending on the dimensions required for your space. I recommend you sketch out your plans like I have. I will post up my plans soon, or if you are interested, email me.
This is the material list for one 27″x96″ trellis.
2 – 2″x2″x96″ pieces of redwood/cedar/teak
2 – 2″x2″x27″ pieces of redwood/cedar/teak (suggest having this cut slightly longer so you can adjust the fit)
2 – 1″x2″x24″ pieces of redwood (suggest having this cut slightly longer so you can adjust the fit)
8 – 1″x1″x33.9″ pieces of redwood (suggest having this cut slightly longer until you actually fit the trellis together so you can adjust for a good fit)
3 – 1″x1″x24″ pieces of redwood (suggest having this cut slightly longer until you actually fit the trellis together so you can adjust for a good fit)

The dimensions and quantity listed above is for a 27″ x 96″ trellis. If you want a larger or smaller trellis, the basic design will transfer, however, you will need to adjust the lengths of the pieces of wood. Think of the first two items on the material list as the frames so they will be cut to the exact dimensions of your trellis. You can cut a 45 degree angle to get perfect dimension. For this project, I just nailed in the top two pieces to the either end of the trellis at the end to stabilize the structure so the actual dimensions of the completed trellis was just under 100″ in reality.


I performed the extra work of cutting into each piece of 1″x1″ for the diagonals so that it would all lay on one plane. I used a nail gun to attach the cut pieces. You also want to make sure that each 1″x1″ is flush with one side of the 2″x2″ so that when the trellis is mounted to the wall, there is space behind the 1″x1″ wood pieces for the vines of the plant to weave through.


I hope to post more detailed plans for this project later on. If I don’t get them up by the time you are inspired to try this out, email me.
Note, if you are looking for just a standard trellis, it is much more cost effective just to purchase one from your garden center. However, if the trellis will be in a special area in your home and aesthetics matter, this is a great option.